Sunday, December 16, 2012

Meet Myra

sometimes i fall off the wagon...i hate when that happens because i get that sort of depressed feeling and i don't want to do projects...then i get a swift kick in the behind and it all comes back...so that is my reason for lack of posts...

right before thanksgiving, a friend of mine asked me to do a few things for her...i couldn't say no...we go way back and i felt like i would be letting her down if i didn't do it...i was still in my depressed state...lack of projects and no energy to do any...but when she said it had to be done by thanksgiving for her big feast, i had to get going...

this project was so fun for me..i have a fondness of sewing machines and their cabinets...although this one lacked the sewing machine, i didn't care...i just couldn't wait to get started...

here she is...miss myra...named for my friends great aunt...i think it fits her perfectly..
after i gave it a quick sanding, i applied some turquoise chalk paint....i had never used this technique before...i had the request of letting some of the turquoise paint show through the black...
this is after i painted black on top of turquoise...i also mixed the black into chalk paint...since i was on a tight schedule, i had to go ahead and sand...its better to wait until its dried out...it makes the process easier when you aren't working with the dampness of the paint....even thought its dry to touch, the paint sticks to the sandpaper when its not cured
here is a close up of the sanding process...see how the turquoise is peeking out?
i kept the original hardware...cleaned them up with some oven cleaner...years of gunk on them came right off...i then applied wax and it was finished!! i did this in a days time...a little faster than i normally like to go
look at this piece...perfect in her new home....i love it...i hope you love it too shuantale! i enjoyed doing it for you....


CREATING LOVE AND JOY
Ashley

Linking Up To:

Thursday, August 23, 2012

Vintage Life Preserver

i've been wanting to do this project for some time...i searched and searched for a tutorial on how to do it...mine didn't exactly turn out the way i wanted it to...i had planned on adding some wording but with the way i did it i didn't have enough room left...

first i took a green foam floral form...say that fast...i spray painted it white but it didn't fill in all of the little holes so i went back and used a brush to paint over it..it took a lot of coats to fill in...
i bought 2 dog toys from the dollar tree...you only need 2 because each toy has 2 pieces of rope knotted together..they are VERY hard to get apart...it took me quite awhile to get the knot loose enough...
i took some denim that i had saved from some cut off jean shorts and made some strips..i just made a seam down each side and hot glued them on...i then took the dog toy rope and hot glued those on...this wasn't the easiest project...it took tons of glue and the back looks horrible...
here it is finished on my mantel...i really do love it but had my heart set on it saying something...
here it is hanging up...i still have some more things to add...things are coming together! 


CREATING LOVE AND JOY

Thursday, August 9, 2012

Bathroom Remodel

i've been busy!! i wanted to share with you what i've been working on...this is a bathroom remodel...i'm not quite finished with it but i will post what i have done and explain how i did it...

first of all, let me start by saying that this bathroom is in a 1979 liberty mobile home...its a little different than a normal bathroom... 

this remodel was done on a very strict budget...it was meant to be a quick fix for a vacation home without having to spend tons of money...

this house was not occupied when we looked at it...very basic white walls that had been sprayed with a gun...there was white over spray on everything...


as you can see, the vanity cabinet was in sad shape...paneling, wood trim, white doors...over look the floor...its pretty bad..2 different floor coverings...

shot of the cabinet white i was prepping for paint
i picked brown...not my first choice but this was oops paint that only cost me about $2...i'm on a very strict budget so brown was the color...

before and after...i need to paint the handles...thats on my to do list!


this wall had a piece of paneling cut and screwed onto the wall! it was covering a small hole...instead of repairing the hole, they just covered it with a piece of wood...how lazy is that?

the same wall after paint...i also picked this color based on oops paint...for around $2.50
before and after...i believe the towel holder was $2.99
wall where toliet is...i removed the towel bar for now
couldn't wait to post!!

little fish that i got at old time pottery
shower curtain that i bought at kmart...shelf said $19.99 but rang up for $8...YAY for me!!

bathmats and toliet cover that i paid $9.99 at old time pottery...
 for around $25 i revamped the bathroom...still have some things to do but pleased so far at the progress that i'm making...i will add more pics of updates...

i still have to redo the floor..another project for another day

CREATING LOVE AND JOY
Ashley

Linking Up To:
At The Picket Fence 
 Kammys Korner


Monday, July 2, 2012

Cut Off Jeans

today i'm sewing...i'm finally getting the hang of cutting off blue jeans and making them into shorts...i'm not sure about everybody else, but for a 41 one year old woman, its hard to find shorts...i refuse to wear "mom jeans" shorts...i mean i'm old but not that old...my legs are not what they used to be...there is some serious wear and tear on them...i can't wear booty shorts either...so i chose to make some myself...

the first pair that i tried was some that i purchased at aero for about $19...i never really cared for the way they fit me..boyfriend cut...i chopped them off last year and just wore them with the strings hanging...this year i decided to go a little more "classy"...LOL...

pair number two came straight from the good will...they looked like i just purchased them at american eagle...i paid $2.94 on 1/2 off day...how can you beat that deal? they were a short so it didn't matter since i knew before hand that they were getting chopped...

and finally the third pair...i got them for $1.00 after a semi trade on facebook...they are also the aero boyfriend cut...

southern girls like cut off shorts...but as an older "girl" i like mine not so short...i just made a reversed hem...they sort of look like i just rolled them up one time...i'm happy with them...


CREATING LOVE AND JOY
Ashley

Sunday, June 24, 2012

Curbside Bookshelf

who says you can't turn trash into treasure? i mean, i do it all the time...i always have an image in my head of the finished product...now if it doesn't turn out that way, thats another story...

about 2 weeks ago i went out onto my patio and found this piece...my husband had picked it up beside the road to put his shoes on..seriously?

first of all let me say that he was not gonna put his shoes on this..in my room...maybe in a closet...but to me thats just kinda tacky...he also said that he thought his hats would look good on it...jeffrey, i really do love you...
i'm always so quick to fire the spray can..i didn't get a good before pic...this is a pork skin holder..yes, you read that right...pork skins...we have a place in our town that makes them...they put these displays in stores to sit the bags on..each shelf had turkey creek wrote on it in red and i really liked the vintage feel of the piece...i originally had no plans to paint it...but, how could i say no to a 10 year old...didn't i write that this week already??
there was a little bit of damage to the legs at the bottom..paint was the best option but this was the cheapest wood ever...even with primer it took a bunch of coats to cover...my daughter and i painted on it for 3 days...i had to do some nailing and gluing on the shelves...they were a little warped..i guess from getting wet...

so another piece of junk turned into somewhat of a treasure...she thinks its worth a million dollars the way she has been acting...cost of project- $0...i had everything on hand that i needed....the less money i have to spend the happier i am...


CREATING LOVE AND JOY
Ashley

Friday, June 22, 2012

Lamp Redo...Again

this week its all about pink, pink, pink...i have several things i want to share, but today i will be posting about a lamp that i originally redid last summer...

i wasn't very fond of it but it was free...but ugly...

we did a spray paint upgrade to this nice turquoise color..the plan was to be an accent color in my 14 year olds bedroom...she moved out of that room into my sons room...it stayed with my 10 year old....i used burlap on the shade...

when you ask a 10 year old what color would you like to accent your room, be prepared for anything...i kept the same shade but just changed out the color...i think it looks good with the black..i do love some pink...but wait to you see how much pink...i have some more things to post so be on the lookout...

update: picked up this cute shade at the local dollar general...
i have enjoyed this week with my hannah working on so many different things....lookout everybody...i may have some competition in the painting world...maybe even a future blogger??

CREATING LOVE AND JOY
Ashley

Tuesday, June 19, 2012

Vintage Vanity

i just happened to come across a deal that i wasn't expecting...i have a store near my house that i was going in at least once a week, but since i've had so many projects going on i quit going in there...i had to get my back porch cleared off...

the day i got it...would you like to know how much i paid for it? $10!! yes, you read that right...super excited about the price..
this is right before i got started on it...my husband was not excited at all..he never has faith in me...LOL..i'm sure he was thinking that i paid too much
besides the mirror being broke, one drawer was warped...the other drawers were so smooth for the age of the piece...
finished with paint...a little wax over that and some stain on top...
i used homemade chalk paint...sanded the pulls, which were rusty, and sprayed them a shiny chrome color...i wanted to keep the original ones...
all finished...a little distressing...perfect for the 10 year old little girl in my life...she is more excited than i am...i really wanted to sell this piece...i would have made a nice profit...but how can i resist a sweet blonde?
before and after...how could i go wrong with this? i can't wait to show the lady i bought it from!!


CREATING LOVE AND JOY
Ashley


Monday, June 18, 2012

The Hot Mess Vanity...Part 1

this vanity has almost killed me...i have finally finished the bottom part...the only thing i have to do now is the mirror..this post will show how after almost a year, i am still alive...


the day i found it at the good will..oh how i was excited!


this is the point where i want to shoot myself...after being so excited about this piece, i have to say i was ready to get rid of it...i was semi new to painting when i started this...instead of doing research on a product, i went with the first review i saw..its was a paint from lowes that said you didn't have to prime...i lightly sanded and slapped the paint on...after several coats, i decided that i didn't like the flat sheen of the paint...i decided to distress it...the first swoop of the sander and the whole side peeled off...now, you can imagine what i was thinking...i immediately put the sander down and walked away...i probably said a few choice words too...this piece sat on my patio for at least 9 months...it almost got ruined from the weather...some of the drawers warped...

i never strip a piece of furniture...there is no point in it to me...i do sand though..since i am usually painting everything i do, that is something that is not important to me...this paint was so awful that i knew if i didn't get all of it removed it would ruin my future work...
here is the first coat of paint...i mixed up my own chalk paint...i love the way this paint sticks to wood..i have even used it on none wood pieces...its a little tricky at first but once you understand how it works and how to mix it can be a real advantage...i also cant afford annie sloan chalk paint...i also put a dark stain on the top..
here are the drawers finished...i used cute little glass knobs from hobby lobby...
finally...the end...white homemade chalk paint...distressed with wax on top...dark walnut stain with wipe on poly for the top...
be on the look out for part 2...when i finish the mirror i will post that

CREATING LOVE AND JOY

Friday, June 15, 2012

Just A Little Curtain

its been awhile! i've been taking it easy on projects and trying to clean out some things...i've become some what of a minimalist...i hate having junk around...unless its good junk :)..i'm in the process of going through clothes and things to sell online...we have a local facebook page that i make a little change on...

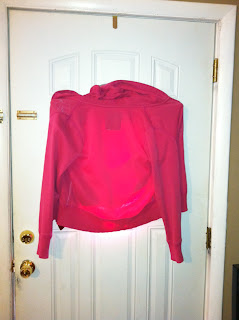
you might think i'm the worse homemaker ever after seeing this picture...yes, thats a jacket hanging over our window...we have one of those doors that has the little rectangular window that is semi-transparent...its not really made for a curtain but the west sun bears down on us in the after noon...i've found that putting something over it will cut the temperature in the room about 10 degrees..maybe more...it gets so bad in the summer time that when you touch the glass door handle it will burn your hand...

finally today i made a little curtain...this fabric was in a scrap box that jeffs grandmother gave me...its a red velvet...i'm loving it...i have red accents in the living room so i think it works perfect...i can cross something else off my list...


CREATING LOVE AND JOY
Ashley

Monday, May 28, 2012

Cut Off Jean Shorts

i have my off days...the past 5 days or so have been that way...i am working on a piece of furniture that i was hoping to be done with on friday or saturday and i missed my goal...that throws me off...i have been trying to get at least one piece done a week so i can link up to blog parties to help build my blog...so far, thats been going great...i have several new followers and lots of sweet comments...i'm just having an off week but i will hopefully catch up...

i've enjoyed my lazy weekend with the family...sometimes it can be too lazy and i have to find something to do...i pinned a pair of cut off shorts a long time ago and i'm just getting around to making them...i love this look!
me posing in the mirror...i tried not to cut them too short...i had a pair of jeans that were pretty worn out...i patched them in the knees a while back but i had some more holes to come in them...they have been in a pile of other things that i wanted to revamp...i measured the length i wanted...marked them...cut...sewed lace on the inside...keep in mind, i'm a 41 year old woman...i can't have them too short...i will embarrass my whole family!

so adorable to me..even though i may not even wear them...i'm a little picky about my shorts..have to get my nerve up with these..if my kids approve, then maybe :)


CREATING LOVE AND JOY
Ashley

Wednesday, May 23, 2012

Dresser Before And After

this post copied from other blog...september 9, 2011 

yesterday i picked up a dresser and night stand for a measly $25...very excited about that! i've been wanting something this style and i just couldn't pass it up...

here is the before...it was missing several of the knobs...i had a brilliant idea to use the ones on the nightstand but it didn't have any! so off to home depot to find the cheapest ones i could find...i chose a small plastic one to use on the top 2 drawers...a can of rustoleum orb to paint them with...
here are the knobs...ignore my fire pit!! i already ruined my stone wall by my pool with spray paint...i had to move on to another area...i love this paint btw! 


here is another before shot with the drawers out....


my husband wanted me to stain the top cherry to match the rest of our entertainment center....i knew i couldn't but i wanted to try....this wasn't laminate but it wasn't wood...fake wood?? i had tried this on another piece and after the stain and some wax it worked out ok...but this piece i wanted to look good so i worked to get the water marks out...i had to sand way down...i then primed with kilz and painted black with 2 different types of paint...one was gloss and the other was matte...i didn't have enough of each so i just mixed them together....worked out fine...

as i was putting the stain on, this appeared on the side...there had been a sticker on here and when the stain hit it, the image came through....i debated wether or not to fix it since it wouldn't show where we were placing it...i thought, what if i want to sell this?? i can't leave that there! i took some primer and went over it...afterwards i wiped some stain over it and it was gone...

finished....the top is still wet as you can see in the pic...i just get so excited i can't wait!! i read on another blog, but i can't remember which one, that they used a plastic table cloth to paint on...i found this for $1.50 at walmart on clearance...it worked perfect!


another after...no table cloth...LOL

before and after  


CREATING LOVE AND JOY
Ashley


see the previous comments below:


1 – 15 of 15
Blogger Kathryn Ferguson Griffin said...
Wow, that is beautiful! Fantastic job! Found you via Between Naps on the Porch. Toodles, Kathryn http://thededicatedhouse.blogspot.com/2011/09/voice-studio.html
September 11, 2011 9:17 PM
Blogger Deborah March said...
REALLY lovely...such a nice updated look! Deborah (happily visiting from http://upcyclingmylife.blogspot.com...hope you can stop by too...)
September 12, 2011 8:37 AM
Blogger Jen-CraftOManiac said...
THE AFTER IS AMAZING, well done. winks-jen
September 12, 2011 10:12 AM
Blogger Steph @ Crafting in the Rain said...
Looks lovely! I just re-did a dresser too, and it's so rewarding! http://craftingintherain.blogspot.com/2011/09/dressed-up-dresser.html
September 12, 2011 10:54 AM
Blogger Just Jaime said...
Pretty! Love the knobs!
September 12, 2011 8:30 PM
Blogger Debra said...
That turned out really nice. What a great deal you got on it too.
September 12, 2011 11:17 PM
Blogger Cassie @ Primitive & Proper said...
SOOO much better and so much more charming and full of character! great job!
September 13, 2011 6:45 PM
Blogger aimee said...
i love what you have done with it. its gorgeous xxx
September 15, 2011 2:48 AM
Blogger Ange said...
Thanks for stopping by and commenting on my entryway! Your dresser looks great, isn't spray paint da bomb diggity? I love to spray paint whatever I can! :)
September 15, 2011 6:08 PM
Blogger Rosie Goins said...
Hi Ashley. Thanks for visiting Dogs & Grandkids. Your makeover looks great.
September 16, 2011 9:38 AM
Blogger Erin of HomeSavvyAtoZ.com said...
Your dresser turned out great, Ashley! What a score for $25! I would love for you to link it up at Freshmen Friday! http://www.homesavvyatoz.com/tips-for-building-your-blog-or-website-freshmen-friday-2/
September 16, 2011 10:19 AM
Blogger Becky@Beyond The Picket Fence said...
What a fantastice redo, good thought to go over sticker area. Thanks for sharing at Beyond the Picket Fence!
September 16, 2011 11:29 AM
Blogger Michelle said...
It looks sooooo much better! Love the way it came out! I am visiting from House of Hepworths and I am a new follower!!! Hope to see you around my Delicately Constructed linky party this weekend! Have a great day! Michelle www.delicateconstruction.blogspot.com
September 17, 2011 1:57 AM
Blogger Heidi said...
It looks so much prettier. You did a great job with the dresser. Love
September 17, 2011 9:07 PM
Blogger Erin of HomeSavvyAtoZ.com said...
Hi Ashley! Thank you so much for sharing your dresser post at Savvy HomeMade Monday and I hope you will come back and party again!
September 18, 2011 8:52 PM